Travel Blog


Biking & Hiking in Palm Springs

December 7th, 2019 ernie Posted in Palm Springs | No Comments »

Palm Springs, California, is a fantastic destination for biking and hiking enthusiasts. With its beautiful desert landscapes, stunning mountain views, and a variety of trails, there are plenty of opportunities for outdoor activities. Here are some suggestions for biking and hiking in Palm Springs:

Biking:

  1. Palm Springs Bike Path: This 17-mile paved path runs along the scenic Tahquitz Creek and offers a smooth ride for cyclists of all levels. 
  2. Indian Canyons: The Indian Canyons area, located just south of Palm Springs, offers several biking trails that range from easy to moderate difficulty. The Murray Canyon Trail and Andreas Canyon Trail are popular choices with beautiful landscapes and an abundance of native flora.
  3. Santa Rosa and San Jacinto Mountains: The Santa Rosa and San Jacinto Mountains National Monument offers challenging mountain biking trails for more advanced riders. The Cove to Lake Trail is a favorite, featuring a 20-mile loop with stunning views and diverse terrain.

Hiking:

  1. Indian Canyons: In addition to biking, the Indian Canyons area offers excellent hiking opportunities. Explore the Andreas Canyon Trail, Murray Canyon Trail, or Palm Canyon Trail, each showcasing unique geological formations, lush oases, and breathtaking waterfalls.
  2. Joshua Tree National Park: Just a short trip to Joshua Tree National Park, it is a haven for hikers. With its iconic Joshua trees, rugged rock formations, and numerous trails of varying difficulty, this park offers unforgettable hiking experiences. Popular trails include Hidden Valley, Ryan Mountain, and Barker Dam.
  3. Tahquitz Canyon: Located near downtown Palm Springs, Tahquitz Canyon is a beautiful desert oasis with a 2-mile hiking trail. This trail leads to a stunning 60-foot waterfall and visit the Tahquitz Canyon Visitor Center.

Remember to stay hydrated, wear appropriate gear, and check trail conditions before leaving. Additionally, be mindful of the desert environment and respect any rules or regulations in place to preserve the area’s natural beauty. Enjoy your biking and hiking adventures in Palm Springs!

For more posts about Palm Springs and things to do there, click here.

AddThis Social Bookmark Button

Aquarius Casino – Laughlin Nevada

December 7th, 2019 ernie Posted in Casinos | No Comments »

The Aquarius Casino Resort is a hotel and casino located in Laughlin, Nevada. It is situated along the Colorado River, offering guests scenic views and various entertainment options.
The Aquarius Casino features a large gaming floor with numerous slot machines, table games, and a poker room. Visitors can try their luck at popular games like blackjack, craps, roulette, and poker. The casino also offers a player’s club for guests to earn rewards and benefits while playing.
In addition to the casino, the Aquarius has many activities and facilities for guests to enjoy. The resort features multiple dining options, including casual restaurants and fine dining establishments. There are also bars and lounges where visitors can relax and enjoy a drink.
The Aquarius Casino Resort hosts live performances and shows for those looking for entertainment. These can include concerts, comedy acts, and other live entertainment events.
Accommodation at the Aquarius includes comfortable rooms and suites with modern amenities. Guests can select from various room types depending on their preferences and budget.
Outside of the casino and resort, visitors to Laughlin can explore the beautiful Colorado River and enjoy activities such as boating, jet skiing, and fishing. The surrounding area also offers hiking trails, golf courses, and scenic viewpoints.
The information provided is based on the knowledge available until September 2021, and there may have been changes or updates since then. It’s always a great idea to view the official website or contact Aquarius Casino for the most current information regarding their offerings and services.
AddThis Social Bookmark Button

Gold Strike Casino – Tunica

December 7th, 2019 ernie Posted in Casinos | No Comments »

The Gold Strike Casino Resort is a popular hotel and Casino in Tunica, Mississippi, in the United States. However, please note that my knowledge cutoff was in September 2021, so there may have been changes or updates since then. Verifying information with the official website is always a good idea, or contacting the establishment directly for the most up-to-date details.

The Gold Strike Casino Resort was owned and operated by MGM Resorts International, a well-known hospitality and entertainment company, until March 2023. The Casino was sold to an indigenous organization. The resort features many amenities, including a casino, hotel accommodations, dining options, entertainment venues, and various recreational facilities.

The Casino at Gold Strike offers a diverse selection of games for visitors to enjoy. They have a large gaming floor with numerous slot machines, video poker and keno machines, and table games such as blackjack, roulette, craps, bubble craps, and poker. The Casino also hosts regular tournaments and promotions for guests who want to test their luck or skill.

As for accommodations, the Gold Strike Casino Resort has a hotel with various room options to suit different preferences and budgets. The rooms are decorated with comfort in mind and include modern amenities like flat-screen TVs, Wi-Fi, and spacious bathrooms. Additionally, the resort offers a range of services and facilities, including a pool, spa, fitness center, and business center.

Dining options at Gold Strike are diverse, with several restaurants and bars available on-site. Guests can choose from casual eateries, upscale dining experiences, and quick bites to satisfy their cravings. The resort also features live entertainment and nightlife options, including shows, concerts, and a nightclub.

It’s important to note that casino resort guests must be of legal gambling age to enter the Casino and participate in gaming activities. Additionally, policies and offerings may have changed, so visiting the official Gold Strike Casino Resort website or contacting them directly for the most accurate and current information is advisable.

For more casino-related posts, click here.

AddThis Social Bookmark Button

Hampton Inn – Wilkes Barre

December 7th, 2019 ernie Posted in Hotel Service | No Comments »

Hampton Inn is a well-known hotel brand that offers comfortable and affordable accommodations in various locations worldwide. While I don’t have access to real-time information, as of my last knowledge update in September 2021, a Hampton Inn is located in Wilkes-Barre, Pennsylvania.

The Hampton Inn Wilkes Barre Hotel is situated in the scenic Wyoming Valley near the Pocono Mountains. It is conveniently located off Interstate 81, making it easily accessible for travelers. The Hampton Inn hotel offers a range of amenities and services, including comfortable guest rooms, complimentary hot breakfast, free Wi-Fi, a fitness center, and an indoor pool.

Please note that it’s always a good idea to check the latest information, including the hotel’s availability and any changes in amenities, directly with the Hampton Inn Wilkes Barre or through their official website or customer service line.

AddThis Social Bookmark Button

Seven Solo Backpacking Tips

December 28th, 2017 ernie Posted in Backpacking | No Comments »

Solo backpacking means peace and quiet. No one to talk to means no words are put between you and the beauty around you. The miles just flow. It’s entirely up to you to say when you eat or take a break. Want to jump in that alpine lake? It’s your decision alone. It’s a unique experience. Here are a few Solo Backpacking Tips.

A solo backpacker also is vulnerable. Twist your ankle, and there’s nobody there to help you. Have you ever been stuck alone without food for days? How can you make your solo backpacking trip safe? You can’t. It’s inherently more dangerous to go alone into the wilderness. What you can do though, is make it safer.

Some Solo Backpacking Tips

1. Tell someone where you’ll be, and when you expect to return.It’s probably best if you leave a map with them, and let them know who to call if you don’t return on time.

2. Bring a cell phone. I don’t do this yet myself, but manylives have now been saved by cell phones. Turn it off and put it in the bottom of your pack so it won’t bother you.

3. Bring the usual safety items (matches, 1st aid, iodine tablets, etc), but double-check to see if they are there and in working order, as you’ll have nobody elses supplies to back you up.

Solo Backpacking Tips

4. If you’re not sure of your abilities, or have a bad knee or other potential problem, stick to well-traveled trails. On many routes, another backpacker will be by every hour. That’s good to know if you’re in trouble.

5. Learn well how to read a map and use a compass. If you are two miles off route and can’t get a signal on your phone when your knee gives out, you’re in trouble. Even if you like to wander, you should be able to know where you are on the map for safety.

6. Know your abilities. Don’t plan on twenty-mile days if you haven’t done them before.

7. Learn to lighten your load. When you’re alone, you lose the efficiency of sharing the load for stoves, tents and other common items. It’s easy – and dangerous – to become over loaded when yours is the only backpack. You might want to read up on ultralight backpacking.

Solo backpacking is riskier, but for some of us, it’s well worth the risk. Try it, and you might agree. Just be sure to take the necessary precautions.

AddThis Social Bookmark Button

A Backpacking List – Things To Learn

December 21st, 2017 ernie Posted in Backpacking | 1 Comment »

Have you ever had a backpacking trip that was a disaster – even though you brought everything you needed? Maybe you had matches,but couldn’t get that fire going. You need more than good gear to assure a safe and enjoyable wilderness experience. You need to know how to do a few things, and the following list will get you started.

1. Learn fire making. Practice in your yard if you have to, but try to start that fire with one match. Try it the next time it’s raining too.

2. Learn to pitch a tent. Do it wrong and the rain will come in, or the the wind will tear the seams. Tents should be pitched tight, and you should be able to set your tent up in a few minutes.

A Backpacking List – Things To Learn

3. Learn how to stay warm. Practice camping in the yard, to see how blocking the wind, wearing a hat, and eating fatty foods before sleeping can keep you warmer.

4. Learn to cook over a fire. It’s not as easy as it seems.Block the wind, cover the pan, keep the fire small and concentrated. Practice, and time yourself. Faster is better in a jam, and it’s always possible your stove will break.

5. Learn about edible plants. Knowing how to identify cattails and three or four wild edible berries can make a trip more enjoyable, especially if you ever lose your food to a bear.

6. Learn how to walk. Also learn how to pace yourself and how to move comfortably over rocky terrain means you’ll be less tired,and less likely to twist an ankle.

7. Learn about animals. Can you tell if a bear is “bluff charging” or stalking you? If it’s the latter, playing dead will make you a bear’s supper. Hint: lots of noise usually means he just wants to frighten you, but you need to read up on this one.

8. Learn to watch the sky. Is that a lightning storm coming or not? It might be useful to know when you’re on that ridge. Learn the basics of predicting weather, and you’ll be a lot safer.

9. Learn basic first aid. Can you recognize the symptoms of hypothermia? Do you know how to properly treat blisters? Good things to know.

10. Learn navigation. Maps don’t help if you don’t know how to use them. The same is true for compasses

You don’t need to be an expert in wilderness survival to enjoy a safe hiking trip. It can help to know a little more though. Use the skills list above, and learn something new.

AddThis Social Bookmark Button

Backpacking Tent Fundamentals

December 14th, 2017 ernie Posted in Backpacking | No Comments »

The qualities desirable in a backpacking tent are different from those tents being pitched next to a car in a campground. The biggest difference being that the backpacking tent will be carried with you and therefore, should be small and lightweight. This is one of the most important Backpacking Tent Fundamentals. Most modern two person tents weight around four to five lbs. whereas a roomy family camping tent can weigh twenty lbs or more. Solo or single person tents can weigh less than three lbs and are great if you are hiking alone. However, if you are hiking with someone else, it usually works out better weight wise to split the gear and take a two person tent.

Tent Quality

The quality of the tent is more important when backpacking. There is usually nowhere dry to go if the tent starts leaking. While a top quality tent is not necessary, cheap discount store tents should only be used if the forecast calls for clear weather.

Being tired, wet, and cold knowing the next dry place is at least ten miles away on a rocky trail will quickly put a damper on what should be an enjoyable outdoor experience.

Clips and Sleeves

There are two common ways that tent poles are attached to the tent. One is using sleeves that the poles slide through and the other is using clips that latch over the poles. Some tents even use a combination of clips and sleeves. In general, clip based designs are easier and faster to set up, while sleeve based designs are stronger and can be easily repaired with a needle and thread right at the camp site. For most conditions, I believe the clips are plenty strong and are generally better because of how quickly they allow the tent to be set up and dismantled.

Free Standing and Staked Designs

Free standing tents seem to have become the norm. Their primary advantage is that they can be set up without being staked into the ground. Stakes are still important to keep the tent from blowing around, but the stakes usually do not need to be driven far into the ground. Staked tents tend to be a bit lighter than free standing tents, but need to be staked solidly into the ground to hold their shape.

Backpacking Tent Fundamentals

Staked tents can be difficult to set up or keep up if the soil is hard or rocky. I’ve become a convert from staked tents to freestanding tents. This has come about after bending multiple tent pegs beyond repair trying to pitch the tent on hard rocky ground.

Single Wall and Double Wall Construction

Double wall tents are tents that require a separate rain fly to keep out water.They are slightly heavier than their single walled counterparts. They also take a bit longer to set up. Many are generally less expensive, warmer, and hold up better in wet conditions. While the lower weight specifications and small packing size of the single wall tents make them attractive. Double wall tents are generally a better deal economically.

Three Season and Four Season Specifications

Three season tents are just that; tents designed for Spring, Summer, and Fall camping. Few people go backpacking in the winter compared to the other three seasons. So the vast majority of tents sold are three season tents. Four season tents are built from heavier materials in order to hold up against the winter weather. They are bulkier and harder to carry. Some manufacturers offer a 3+ season tent if you are camping early in the Spring or late in the Fall. But unless you are planning specifically to camp in the winter months a three season tent is more than sufficient without undue bulk and weight.

Vestibules

You may not have room to keep your shoes in the tent with you. Vestibules are a great place to keep them dry and yet outside the main tent. Some vestibules provide enough of an overhang to allow the screen or even the door to be open during the rain. I personally enjoy feeling the breeze from a storm while I am dry inside the tent. Most people probably would not consider the vestibule worth the weight, but they are a nice luxury.

Conclusions

Different individuals will select different tents based on various factors. Understand the fundamental differences between tents. This information can help you pick the tent design that fits your hiking style and conditions.

AddThis Social Bookmark Button

Lightweight Backpacks – How Light?

December 7th, 2017 ernie Posted in Backpacking | No Comments »

How light is light? Lightweight backpacks weigh less than three pounds, a standard I just invented. There are good packs under three pounds for almost all types of trips. My own Golite backpack weighs just 14 ounces, and has a capacity of 2900 cubic inches, plus 1000 more in the extension collar. It’s more comfortable than any frame pack I’ve used, but then I don’t carry more than 20 pounds in it.

The mesh outer pockets are a great idea. I stuff my wet tarp in the large one in the morning, where it’s easy to take out to dry later. I’ve had my GoLite for ten years. I’ve used it from the rain forest to glaciers at 20,600 feet on two trips to Ecuador,as well as in the Rockies, the Smokies, and in Michigan. Packed right, it qualifies as carry-on when I fly (I don’t like to check luggage).

My next pack will probably be the tougher Go Lite Gust, which weighs 20 ounces. I just read seven reviews, all of them praising the pack. One reviewer used it for the weekend with a27-pound load, so a lightweight backpack doesn’t have to be light-duty.

Using Frame less Lightweight Backpacks

Like mine, many lightweight backpacks don’t have frames. I use a sleeping pad for a frame, as is recommended. Some backpackers just put the pad in

Lightweight Backpacks – How Light?

the backpack loosely rolled, with everything inside it. I’ve found a better way.

Take a closed-cell pad, like the cheap blue ones, and cut it across, halfway through the foam, on opposite sides. You can accordion it into a three layer thick (2 cuts) or four layer thick (3 cuts) back-padding frame. The “hinges” thus created last a long time. Put the pad in the pack, (against your back)and load everything in behind it.

Other Backpack Options

If you want lightweight AND cheap backpacks, start experimenting. I’ve used an old aluminum pack frame and large duffle bag, to create a full-suspension pack that weighs just two pounds. Though it carried loads well in the mountains of Montana, it wasn’t the most convenient to use. By the way, it is lighter than any frame pack I’ve ever seen advertised. The 8-ounce duffle works okay as a backpack by itself too.

I recently bought a lightweight backpack at Walmart. It weighs six ounces, and it is actually comfortable. It’s a day pack, but large enough for overnight hikes, since I travel really light.It cost just four dollars. Light weight backpacking gear isn’t always expensive.

AddThis Social Bookmark Button

Bivy Sacks – Making Them Yourself

November 28th, 2017 ernie Posted in Backpacking | No Comments »

If you have ever looked at bivy sacks in catalogs or online, you know they can be claustrophobic and expensive. I can’t help you much with the first, except to say that you’ll get used to it.The expensive part, though, I have a solution for.

I didn’t want to spend $200 for a nice bivy, so I bought an”emergency bivy” for $20. It was basically a large plastic bag.I tested it on a rainy night, with a small umbrella over my head. I tried not to breath in the bag, but I still thought I’d be soaked by the condensation, like all the books warn. In the morning I was surprisingly dry.

Later, when I lost my bivy, it occurred to me that if it was basically a large plastic bag, why pay $20 or $200 to replace it? I got out two extra large garbage bags and duct-taped them together. After cutting open one end, I had a three-foot by seven-foot bivy sack. It weighed just four ounces.

Bivy Sacks – Making Them Yourself

Now, if you have looked at bivies before, you know that none arethat light. Even my “emergency bivy” weighed twice as much. It was a bit tougher, but then I use my four-ounce bivies as disposables. They are good for a week of nights if you’re careful. At less than a dollar each, it doesn’t hurt to throw them away at the end of a trip.

Like most bivy sacks, it will leave you a little damp in the morning. It is best used in dry environments, although I used mine in Michigan without any real problems. In any case, you’ll dry out in a few minutes once you start hiking. You will also get in the habit of taking a break to lay your sleeping bag in the sun to dry any dampness.

There’s our lesson on making ultralight bivy sacks. Four ounces,and they fit in your pocket. This isn’t my only disposable lightweight backpacking gear by the way, but that’s another story.

AddThis Social Bookmark Button

Essential 12 Volt Camping Supplies

November 21st, 2017 ernie Posted in Camping | No Comments »

Have you ever tried coming close to nature and experience the beauty of it with the help of modern technology? I guess not. That’s what I’m talking about, that’s why Essential 12 Volt Camping Supplies make it easier for you to come close to the nature with the help of modern technology and make the most of it.

First tackle the freezing of various body parts at night. Yes I am talking about the 12 volt electric blanket which is one of the most popular of all the 12 volt supplies. They are very handy as well. It gets plugged into your vehicles cigarette lighter and large enough to accommodate two people. Now I see no reason for not cuddling up with your significant other on a camp out.

Now this one is for coffee and tea lovers who understand the importance of that first cup of caffeine in the morning. You can say one of the most headache reducing 12 volt supplies out there is the liquid heater. Once again very handy to use. Plug the lighter onto the cigarette lighter. This heater is capable of heating any kind of liquid, be it water, coffee, tea or soup. Make hot chocolate. It’s very important much faster than rebuilding the fire and waiting for the water to reach the hot temperature.

Essential 12 Volt Camping Supplies

Now have you ever heard of packing the kitchen sink and carrying it along? Do you think it’s really possible? Yes it is with the help of 12 volt supplies. Most of these supplies are equipped with power cord and stove is no exception. Very easy to use and can help with quickening the heating of food, baby’s bottle and host of other meals. Also  sandwiches, soup and last night’s leftovers can be easily heated up after a busy day of hiking or swimming.

Many people don’t care about all these little things when they are camping. But sometimes a little more convenience is necessary after a busy day of adventure. That’s were 12 volt supplies come in and makes life less hectic. Travel is one of the modern family’s ways to escape. A weekend excursion, an extended fishing trip, or week in the mountains can offer a chance to reconnect. A rare commodity in today’s busy world.

But taking advantage of the bevy of technological advancements available to us means that a family getaway doesn’t have to mean “roughing it” in uncomfortable temperatures. Herein the12-volt travel products which include air mattress, heated massaging seat cushion, curling iron, electric blankets, cordless shavers, and hair dryers come into play thus maximizing our enjoyment and opening up a world of possibilities.

AddThis Social Bookmark Button

Wilderness Survival Backpacking Tips

November 14th, 2017 ernie Posted in Backpacking | No Comments »

Why should you learn wilderness survival skills just for backpacking? They may save your life someday, and for ultralight enthusiasts like myself, skills replace gear, and therefore weight. The best reason, however, maybe that it’s just a good feeling to know you can deal with whatever comes up. It makes you feel more at home. We have collected a few Wilderness Survival Backpacking Tips that should cover the basics and help you survive.

To survive means to stay warm and dry, hydrated, uninjured, and to find your way out of the survival situation. Eating is nice too, but not crucial if the situation is for a few days. Below are some more or less random survival tips, just to get you interested.

Wilderness Survival Tips

1. Warmth: Sleep with your head slightly downhill to stay warmer. This may take some getting used to, but it works.

2. Food: In North America, there is no berry that looks like a blueberry, strawberry, or raspberry, which can hurt you from one taste. Just spit it out if it doesn’t taste right. If it looks and tastes like a blueberry – it is.

3. Firestarter: If you put dried moss or milkweed fuzz in your pocket as you walk, you’ll have dry tinder to start a fire, just in case it’s raining later. Experiment with different materials.

4. Direction-finding: Mark the tip of the shadow of a stick, and mark it again fifteen minutes later. The line between the first and second marks points east. A few techniques like this can save you when your compass is lost.

Wilderness Survival Backpacking Tips

5. Weather: In the Rocky Mountains you can see the clouds forming just before the afternoon storms. Being able to read the sky can keep you out of trouble. Lightning kills hikers in Colorado regularly.

6. Staying dry: Hypothermia is the biggest wilderness killer, and getting wet is the biggest cause. Watch for ledges or large fir trees to stand under if you see the rain coming.

7. Shelter: A pile of dry leaves and dead grass can keep you very warm in an emergency.

8. Hydration: Fill water bottles every chance you get, and you won’t have such a hard time with any long dry stretches of trail.

9. Injury: Pop a “blister” on the trunk of a small spruce or fir tree, and you can use the sap that oozes out as a good antiseptic dressing for small cuts.

10. Firestarter: White birch bark will usually light even when wet.

These are just a few of the wilderness survival tips and techniques you can easily learn. Why not practice one or two on your next backpacking trip? For more tips about wilderness survival and backpacking, click here.

AddThis Social Bookmark Button

Choosing A Backpacking Stove

November 7th, 2017 ernie Posted in Backpacking | No Comments »

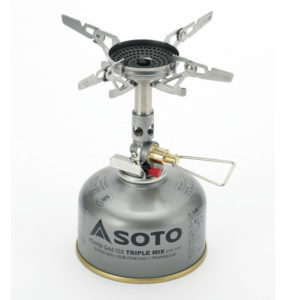
Backpacking stoves have continued to get smaller, lighter, and easier to use. With advances in stove design, improvements in pre-prepared backpacking food, more people are choosing a backpacking stove. This has resulted in more choices for consumers, who are often uncertain about what advantages different types of stoves offer.

The two most common types of backpacking stoves are canister stoves and liquid fuel stoves. Canister stoves use pressurized disposable canisters that contain a mixture of butane and propane. Canisters are already pressurized. There is no need for pumps or heavy fuel bottles. This makes the canister stoves small and light. The canister stove simply screws onto the canister. If it is equipped with a Piezo ignition can be ignited reliably with the push of a button.

Liquid fuel stoves use small hand pumps to pressurize the fuel along with mechanical devices to atomize the fuel. These stoves have seals and moving parts that may need maintenance from time to time including lubrication and seal replacement. Liquid fuel stoves are generally heavier, but provide fuel options. Depending on the stove, liquid fuel stoves can run on various fuels including Coleman Fuel, Kerosene, or even Gasoline.

Choosing A Backpacking Stove

This flexibility can be a huge advantage; not only because liquid fuel is cheaper, but it is easier to find. Liquid fuel stoves also tend to heat better in temperatures near freezing. Canister stoves become stubborn to light. They take significantly longer to heat as temperatures drop near or below freezing. These are just a few of the factors to take into consideration when you are choosing a backpacking stove for your travels.

The type of cooking that will be done is also important in selecting a stove. If the sole purpose of the stove is to heat water to hydrate pre-prepared backpacking food and make hot drinks, almost any stove will do. If simmering of sauces, soups, or noodles is required, then the small torch like burner heads on many canister stoves should be avoided as they tend to heat unevenly and burn the food directly above the flame. Larger burner heads are generally better for simmering food even though they add size and weight to the stove.

Understanding the advantages and disadvantages of the different types of stoves will help in selecting the stove best suited for the conditions.

For more backpacking information and ideas, click here.

AddThis Social Bookmark Button

Survival Clothing For Outdoor Emergencies

November 1st, 2017 ernie Posted in Camping | No Comments »

Survival Clothing For Outdoor Emergencies
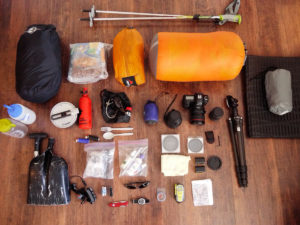
Maybe you don’t need to learn about survival clothing. Maybe you always hike with a spare jacket. Perhaps you never go out into the wilderness overnight, but just for day hikes. Or you bring lots of warm clothing when you do go backpacking. This post is about Survival Clothing For Outdoor Emergencies, something we should all know about.

Nonetheless, hundreds of people die or come close to dying every year from exposure. They thought they were prepared. They didn’t expect their clothes to get wet from falling in a stream, they didn’t think they’d be out there for the night, or they get lost for days.

Coming down from Mount Whitney I met several young men in t-shirts on their way up, determined to get to the top. They had no gear and not enough time, but they probably made it there by sunset anyhow. They also certainly didn’t make it the eleven miles back to their car before dark. It was below freezing that night, so I imagine they were uncomfortable at best. They were not prepared, with Survival Clothing For Outdoor Emergencies

Quick Survival Clothing

What survival clothing could they have made in that situation? One of them did have a light jacket. He could have used his t-shirt as a hat (a lot of heat is lost through the head) and filled his jacket with the fluff from the cattail seed heads for insulation. (Cattail down was once used to fill those old orange life preservers.)

Insulation is an important principle here. You can stuff a jacket, shirt, sweater or pants with dry leaves, milkweed down, bracken ferns, or almost anything that creates a lot of “dead airspace.” It’s better if you have two layers to sandwich it between, but being itchy is better than being frozen in any case. this is really what we mean when discussing Survival Clothing For Outdoor Emergencies.

Survival Clothing For Outdoor Emergencies

In a jam, you can also use the flat leaves of cattail plants to weave a vest that will block the wind and some rain. Two bread bags full of milkweed down or other silky plant fibers make warm mittens (tie them at the wrists). A plastic bag full of the same could be tied onto your head as a hat.

Usually, you’ll do better to look first at what you have, before looking to kill animals for their skins or weave grass skirts. If you have a sleeping bag, it can double as a coat – just wrap it around you. Socks can be mittens, and garbage bags can be made into snow pants.

A garbage bag can also be a raincoat. Otherwise, tie bunches of grass tightly together along a string or strip of cloth, and then wrap it around your shoulders. This will repel light rain. You can fashion a rain hood of birch bark as well.

In the desert, you can make a sun-hat of large leaves, like those from a fan palm. String some together to wrap around your shoulders to prevent sunburn.

You’ll probably never have to use animal skins for survival clothing. You might never lose your shoes and need to glue tree bark to your feet with pine sap, for hiking. Still, knowing how to improvise a few basic pieces of survival clothing can make you more comfortable, and possibly save your life. For more camping information and posts, click here.


AddThis Social Bookmark Button

Money Saving Travel Tips

October 30th, 2017 ernie Posted in Trip Planning | No Comments »

Money Saving Travel Tips
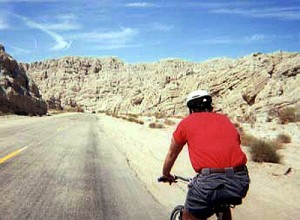
This rotten winter might have you hankering to take a vacation. And the less-than-robust economy means you’d probably like to travel for the least amount of money.  It is time for money saving travel tips. Always look for deals and ways to save money, but you need to watch out for scams as well. If your planning a vacation check out all of the deals, take advantage of traveling in time frames that are not as popular.

Visit travel shows and pick up tips as well as coupons for discounts on various trips and places to visit.

Money Saving Travel Tips

To get an airline’s lowest airfare, try calling the carrier instead of booking online. You may think all the available inventory is on the web. Not even close. It’s only the inventory they want to put online. The same applies to hotels.

As an example, The lowest fare online: American’s $809. Calling American directly and asking if the airline had a “positioning flight” (when a carrier needs to get one plane from one city to another); netted a flight for $109.

If you searched for airfares on a site but didn’t buy a ticket, use a different browser or computer on your next visit or clear your computer’s cookies and cache. Otherwise, you may be shown a higher fare because you left cookies the first time and the site knows you’re eager to buy.

If you belong to a Frequent Flier program, check its site for fares using your number and without it. “Delta offered me a fare for $529 and then I went put in my Frequent Flier number, the fare suddenly jumped to $607,” They said there was a different class of tickets for Frequent Fliers.”

Train lovers with time on their hands should look into Amtrak’s 15-day go-anywhere deal. “You can get off and on anytime and see all of your dysfunctional relatives in one trip for $500; $250 for kids under 12.

Exploit the cruise industry’s bad publicity (the Costa Concordia and Carnival Triumph disasters) and excess capacity. “It’s a buyer’s market with rates as low as $149”.

Call a hotel directly for its best room rate rather than booking online or phoning its 800 number. “You can get more discounts from a phone call than from a website,”. Conversely, if the hotel rate is higher than usual, check the online price. Sometimes they forget to update the prices online.

When you call, ask for the manager on duty or director of sales, not “reservations,”. That’s the person who knows that a wedding just canceled and the hotel suddenly lost 30 booked rooms.

Ask value-added questions: Can my kids stay free? Can they eat free? I recently had to rent a car in San Francisco and asked the hotel if I could get free parking and I did. The parking normally costs $42 a night.

Consider alternative lodgings to hotels. “I love hotels, but they’re rarely the most interesting place to stay and they’re usually the most expensive,”. One person bragged about renting a two-bedroom apartment in Venice for $83 a night.

Scams

Watch out for “free” travel offers on Facebook. What may look like a giveaway of two free Southwest tickets from “Allison” is really a ruse to trick people into giving up personal information.

Never click through a link, even if it looks legitimate.

Don’t agree to rent out someone’s home until you speak, Skype or FaceTime with them. “Legitimate renters are happy to talk to you. Skype or FaceTime conversations are best because you can then insist on seeing the whole apartment or house.

Bargain destinations

Visit countries where few Americans vacation.

Go where the local currency has been pounded.

But perhaps the biggest bargain of all (once you get there): Bali in the South Pacific. You can almost live there on $5 a day.”

For more travel planning posts, click here.

Save

AddThis Social Bookmark Button

Best Backpacking Foods

October 28th, 2017 ernie Posted in Backpacking | No Comments »

Maybe your favorite backpacking food is a freeze-dried turkey dinner. There really is no “Best Backpacking Foods”. There are reasons to bring certain foods, though. Here are ten foods, and the reasons you might want to consider them.

1. Nuts. This is one of the most calorie-packed foods you can take. That means less weight to carry. With lots of protein and other nutritional benefits, nuts are one of the best backpacking foods.

2. Olive oil. Add a little to your soups or dip bread in it. The best of the oils health-wise, you can eat it before sleeping, to stay warm, because fats generate heat when digested.

3. Trail mixes. Any mix with raisins and nuts is great for backpacking. Vitamins, minerals, protein, and the best reason -convenience.

4. Corn products. Tortilla chips or corn nuts are convenient, and they don’t seem to cause the tiredness that potato chips and other simple carbohydrates can cause.

5. Ramen noodles. When you need a hot meal fast, there isn’t much that’s better.

Best Backpacking Foods

6. Instant coffee. A necessity for caffeine addicts, and it’s good to have a stimulant available for emergencies.

7. Wild edible berries. Learn to identify a few, and you’ll have a nutritious excuse for a break along the trail.

8. Instant sports drinks. Pour a little in your water bottle and shake. Replacing electrolytes doesn’t get more convenient.

9. Instant re-fried beans. When you want sustained energy, eat beans.

10. Your favorites. Having your favorite foods can help salvage a rainy backpacking trip spent in the tent.

Always consider the nature of the trip when you choose your backpacking food. Hot meals are much more important in cold climates, and convenience is king if you want to make miles. A bottle of rum might even be appropriate if it’s a trip with friends. For more backpacking details, click here.

AddThis Social Bookmark Button

Sleeping Pads For Lightweight Backpacking

October 21st, 2017 ernie Posted in Backpacking | No Comments »

Sleeping Pads For Lightweight Backpacking
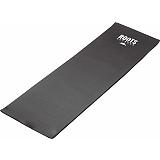
Ultralight backpackers want to give up weight, not comfort. Sleeping Pads For Lightweight Backpacking are pretty much a necessity for backpacking comfort, but who wants to carry those monstrous old inflatables down the trail? Try some of these lightweight options instead.

You can make four-ounce sleeping pads – then sometimes carry two of them. Start with the plain blue closed-cell foam pads available from any backpacking supplier. These are made larger than necessary, usually 24 by 72 inches. You can just cut them down to a four-ounce size.

It’s important that it reaches from your shoulders to your hips, so cut it to that length. Cut the width a little at a time, testing for comfort as you go. You want the pad as small as you can make it, while still big enough to insulate your torso from the ground. Your head can be on a pillow of spare clothes, and your legs on your empty pack to insulate them.

Sleeping Pads For Ultralight Fanatics

If you want it really light, cut pieces out of the pad. Half-inch holes in the pad don’t seem to make it less comfortable. Cut out a hundred little pieces of foam, and you get to save an ounce and join the ranks of the fanatical ultralight backpackers. That is what Sleeping Pads For Lightweight Backpacking is all about.

Sleeping Pads For Lightweight Backpacking

To be comfortable with a thin pad, or none at all, try sleeping where the ground is soft. You can also pile up leaves or dry grass to sleep on. Please do this only where it won’t harm the environment, and scatter the leaves in the morning so they won’t kill the vegetation they’re on. With fifteen minutes of work each night collecting materials, you can leave the sleeping pad home and be more comfortable. A thick pile of dried grass – now that’s a nice camping mattress.

More Comfortable Sleeping Pads

Do you need more cushioning? Inflatable sleeping pads are no longer out of the question for lightweight backpacking. REI’s Big Agnes Air Core Pad is a 3/4 length pad that weighs just 16ounces and is an incredible 2 1/2″ thick! I haven’t tried this one yet, so if you’ve slept with Big Agnes, let me know how she is.

There are also several self-inflating sleeping pads that are reasonably light. My old Therma rest is actually only 21 ounces, but both Therma rest and others now have self-inflating sleeping pads that are under a pound. Now that’s lightweight backpacking comfort!

For more backpacking and camping information, click here.

AddThis Social Bookmark Button

Backpacking In Siena, Italy

October 14th, 2017 ernie Posted in Backpacking | No Comments »

Backpacking TipsSiena is located an hour or so outside of Florence, Italy. My handy dandy guidebook suggested it was a side trip that just had to be made. Backpacking In Siena can be an interesting side trip. A medieval structure located behind protective walls on the top of a hill. The central area was generally closed off to cars and it was a taste of true Italy. Who was I to argue?

As I sat on the train, I check my backpack for any excess weight. I had already discarded or sent home unnecessary items and was feeling pretty light on my feet. The next thing I knew, the train had stopped and I was standing on a flat road next to a rolling hill covered in trees and homes. My Backpacking In the Siena trip was at the top.

The thing about rolling hills with lots of foliage is they are simply evil. You can never get a grasp on how far it is to the top. You keep thinking the top appears to be a few hundred feet in front of you until you reach it. Then you discover it is just a dip before another upward section. The hill up to Siena is just such a rolling hill. Throw in a road that twists all over the hill like a drunken sailor on leave, and you’ll never scoff at a moped again.

Getting in touch with my inner mule, I began to climb and tame the great beast. As I trudged along, I thought of all the great people that must have walked up the same hill throughout history. As I stood in the shade panting, I thought all of those great people probably hitched a ride instead of walking like me.

Backpacking In Siena, Italy

After thirty-five minutes or so, I was seriously starting to think about hitching a ride. Of course, this would mean admitting defeat. The battle between my genetic male stubbornness and “this sucks” attitude was intense. Like a mule,I kept going. Five bends, three dips that I could have sworn were the top.

Just as I was giving in…a wall. A really big wall. I passed it and suddenly was in a large parking lot area with tourist buses. Hands-on knees, shirt soaking, I tried to maintain my dignity as the tourist looked at me like I was insane. Did that moron walk up here? One even took a picture!

After composing myself…err, getting my breath back, I booked a room in a little hotel. The young lady working the desk seemed hesitant, but I made some comment about it being a long way up from the valley. She started giggling and I had the room.

I showered and went looking for trouble. Well, trouble that was on a flat surface. In the town center, I stumbled upon a small café selling Mexican beer. Being from San Diego, this was nirvana. My inner mule was quickly appeased and the hill of death forgotten.

Reflecting on my climb from a historical perspective, I learned a good lesson. It is far better to be behind the wall than trying to attack it! For more Backpacking In Siena and other locations, click here.

AddThis Social Bookmark Button

Eat Plants While You Hike

October 7th, 2017 ernie Posted in Camping | No Comments »

Eat Plants While You HikeKnowing a few edible wild plants can make your next backpacking trip, or any trip into the wilderness, a lot more enjoyable. Eat Plants While You Are Hiking should be taken seriously to avoid eating the wrong plants that can be poisonous or make you sick.

You can pack lighter if you eat wild berries every morning for breakfast, for example, and leave your oatmeal behind. So push the bears out of the way and gorge yourself on blueberries. Less weight on your back always feels better.

You’ll also enjoy your backpacking more when you know you won’t be completely helpless when you lose your pack. Or if a raccoon empties it for you. You don’t have to be a survivalist to see the value of knowing which of the wild plants around you can be eaten.

Eat Plants While You Hike

I regularly eat dandelions, wild currants, pine nuts, and other edible wild plants. I ate hundreds of calories in wild raspberries during a break while hiking in the Colorado Rockies. During a kayak trip on Lake Superior, a friend and I spent half a day stopping at every little island to fill our stomachs with wild blueberries. We were almost out of food, so our foraging helped us get through the rest of the trip. Edible Berries

Here are just some of the wild berries my wife and I ate while hiking to Grinnell Glacier in Glacier National Park: Blueberries, Service Berries, Rose Hips, Blackberries, High Bush Cranberries, Strawberries,

Raspberries, Thimble berries, and Currants. Berries are the most convenient, calorie-rich, and nutritious of the edible wild plants out there. They are also the easiest to learn to identify.

Edible Wild Plants And Survival

If you travel in isolated wilderness areas, learning to identify a few edible wild plants can keep you safe, also. Someday you may be lost or injured, or a bear will push you out of the way to gorge himself on your freeze-dried meals. In a survival situation, food isn’t usually a priority (warmth and water are), but a pile of roasted cattail hearts will surely cheer you up and warm you, and they taste good.

Stay away from protected plants, of course, unless you are in an actual life-or-death situation. Also, don’t eat all the beautiful flowers or kill off the lilies by eating all the bulbs. Use common sense. If you aren’t sure if you’re doing harm, stick to eating wild berries.

Check out a few books on harvesting wild food. You don’t need to become a wilderness survival fanatic. You only need to learn to recognize a dozen high-calorie, abundant wild edible plants to be safer in the wilderness and enjoy it more. For more camping posts and about Eat Plants While You Hike, click here.

AddThis Social Bookmark Button

Lightweight Backpacking Techniques

October 1st, 2017 ernie Posted in Backpacking | No Comments »

These lightweight backpacking techniques  and tips are options or ideas, not recommendations. I tend towards the extreme side of ultralight backpacking, and if you don’t know yourself or your skills, some of these techniques will get you into trouble.

A good example of this is the “natural mattress” that allows you to leave your sleeping bag behind. With this technique, I’ve slept with no pad, and only a five-ounce sleeping bag liner, on a night when it was near freezing. It took fifteen minutes to collect enough bracken ferns to make a two-foot thick mattress, but it was comfortable and warm.

You can use leaves, pine needles, dead grass, or dry bracken ferns. All you do is make a pile big enough to set your tent or bivy sack on. This could damage the environment in some areas, souse common sense, and collect only DEAD vegetation. Also, scatter your materials in the morning, so they won’t smother the plants underneath.

An important point here is that you have to know your environment, so you know you’ll be able to find proper mattress materials. Otherwise, you could have a very cold night or worse. Also, gloves make it easier and safer to collect ferns or grass. Try this first near home.

Knowledge Reduces Weight

Learn certain backpacking techniques, like the one above, and you can carry a lighter sleeping bag, less clothing, and even less food. Wilderness survival knowledge can help you reduce weight, but it also lets you travel the wilds more safely.

Learn which berries are edible, and you can eat as you like and bring less food. I’ve eaten half of my calorie needs in the form of berries on some days in the wilderness.

Lightweight Backpacking Techniques

During a hike to Grinnel Glacier in Glacier National Park, my wife and I ate nine types of wild berries. Finding your own food also helps to contribute to Lightweight Backpacking Techniques.

Researching the climate, and timing can help you reduce weight. You can leave rainwear home, for example, if you’re in the eastern Sierra Nevadas in September (bring a garbage bag for emergencies). I sometimes plan trips to coincide with the full moon. I enjoy getting up at four in the morning and hiking by moonlight, and since I’m up and moving at the coldest time of the night, I can get by with a lighter bag.

Money Reduces Weight

The money will buy you lighter gear, and expensive backpacking gear is generally of very high quality. I didn’t enjoy paying over$200 for my sleeping bag, but I’ve never yet been cold in it, and it weighs just 17 ounces.

Concentrate on the larger items. A sawed-off toothbrush could save you 1/4 ounce, but a lighter shelter can save you pounds. Consider small things last. Buy dual-purpose items, like a poncho that can double as a shelter. Drink soup and tea from your pan, and you won’t need a bowl or cup.

Leaving Things Reduces Weight

This can be the tough part of lightweight backpacking. Ask of every item; Can I get by without it? Stoves aren’t necessary if you bring ready-to-eat food. You don’t need a change of shirt or pants on a three-day trip. If you’re not sure you’ll be happy as a minimalist, go back to the money solution. Start replacing your things with the lightest alternatives you can buy. There are many ways to go lightweight backpacking.

For more backpacking information, click here.

AddThis Social Bookmark Button

Trekking Poles And Hiking Staffs

September 28th, 2017 ernie Posted in Camping | No Comments »

Trekking Poles And Hiking StaffsAre walking sticks longer than trekking poles? What about hiking staffs and hiking sticks? Whatever you call them, and whatever their differences, they are supposed to help your knees more than anything. Trekking Poles And Hiking Staffs help your balance on narrow paths.  This they do very well, at least when you’re going downhill.

What else are they good for? They help you keep your balance. You can use them as a defense against wild animals as well. I use a walking stick to rest my head on from time to time, and I also use it as a monopod for steadying the camera. Do You Need Trekking Poles?

What if you don’t have knee problems, and you are hiking on level ground? Then maybe there is no point in using trekking poles. They can be just more things to carry.

Do they save energy? They take the weight off your joints, but logic says you’ll expend more energy by carrying them. I use a walking stick at times when my knees insist, and it’s fun to poke at things, but it’s not a necessity. For what it’s worth, Ray Jardine, the “father” of ultralight backpacking, doesn’t recommend trekking poles.

Trekking Poles And Hiking Staffs

Walking Sticks and Other Options

I often cut dead sticks and use them until I lose them. I always lose my walking stick – a good reason not to buy the expensive ones. If I do still have it at the end of the trail, I leave it for the next hiker. Hand-cut walking sticks are heavier than high-tech trekking poles, but you can just leave them behind when you get tired of them.

You can use bamboo to make good light hiking staff. It’s stronger than it looks, so use a piece that’s only about 3/4″thick. I bought cheap decorative bamboo at Pier One Imports, and cut it to size. You can glue some soft scrap leather on for a comfortable handgrip.

Finally, ski poles work as trekking poles. It’s best if you remove the baskets, especially if you’re hiking in wooded areas where they may catch on something. for more Trekking Poles And Hiking Staffs and camping related information, click here.

AddThis Social Bookmark Button

Lightweight Backpacking

September 21st, 2017 ernie Posted in Backpacking | No Comments »

You aren’t lightweight backpacking if you are carrying twenty-five pounds for a summer weekend. I invent these standards, but I try to be reasonable. I backpack with less than fifteen pounds total weight for a weekend trip. With a few new pieces of gear, and a little knowledge, you can probably carry less than twenty pounds for a three-day trip, and less than thirty for a week-long trip.

Start by throwing out those pack weight/body weight formulas.Learn the principles of lightweight backpacking, and you’ll never be close to what they say you can carry anyhow. And who wants to carry 25% of their body weight down the trail? The question to ask is “How much do I need to carry to be safe and comfortable?”

Lightweight Backpacking Isn’t Masochistic The biggest reason for lightweight or ultralight backpacking is to enjoy the trip more. I don’t leave crucial things behind or otherwise make myself miserable, just so I can call it lightweight backpacking.

Here’s a good rule: Go as light as you can without sacrificing things that are most important to you (safety items, a good book, a bottle of rum?). It’s not about giving things up. It’s about carefully choosing what you really need to have an enjoyable, safe trip, AND replacing heavier things with lighter things.

Lightweight Backpacking

For example, if you really need an inflatable pad, get rid of that 2-pounder and buy one of the new 13-ouncers. My down sleeping bag weighs 17 ounces and has kept me warmer than any 3or 4 pound bag I’ve had. If you replace items one-by-one with lighter alternatives, you can eventually cut your pack weight by half or more.

Start by setting aside your lightest sweater, socks, hat, etc.Then, when you can afford to, buy one of the big three (pack,tent, bag) because this is where you’ll save the most weight. Of course, going light can be expensive, but I’ve gone 110 miles in seven days (no blisters) with $7 running shoes, so it doesn’t have to be.

How Much Weight?

With proper equipment and skills, you probably can be comfortable and safe with twenty pounds on your back for the weekend. Watch yourself on your next hike. What did you actually use. Which items brought you the most comfort? What can you leave behind next time? What can you replace with lighter items?

My first really light backpacking trip was a true test in the mountains of Colorado. It rained or snowed every day. I went 110miles without a blister, climbed 5 “four teeners”, stayed warm and dry, and never had more than 17 pounds on my back. Oh, and I  never had as much fun with a heavy pack. That was light weight backpacking at its best.

AddThis Social Bookmark Button

How To Stay Warm Backpacking

September 14th, 2017 ernie Posted in Backpacking | No Comments »

Stay warm or die. That’s what it comes down to at the extremes. More people die in the wilderness of exposure than from any other cause. Staying warm, of course, also means more comfort, and for backpackers, it can mean going even lighter, without more risk. How to Stay Warm Backpacking is one of the key things that everyone needs to pay attention to.

Staying warm in the wilderness is about proper gear and good skills. Proper gear means clothing and equipment suited to the environment you’re in. This is a subject in itself, worth studying if you spend much time backpacking. With better materials and designs, the newest clothing and equipment saves lives. It is skills, however, that make the biggest difference. The following provides more information about how to Stay Warm Backpacking.

How To Stay Warm – Tips and Skills
– Set up camp in the right places. Hilltops are windy and cold, and cold air also fills valleys at night. Level ground somewhere in between, out of the wind, is best.
– Wear clothes to bed. Shake and fluff them up to make them insulate better. Some recommend against sleeping in clothes, but I’ve tried it both ways many times, and it’s always warmer with clothes on.
– Wear a hat. This may be equal to a pound of insulation in your sleeping bag. A lot of heat is lost through an uncovered head.
– Go to bed dry. Stay up until your clothes have dried, or change into dry clothes. On a warm, dry night, however, you can put damp clothes on your sleeping bag to dry them with body heat. You may need warm, dry clothes the next night (Thinking ahead is a great wilderness skill).
– Breathe into your sleeping bag. Only do this in a dry climate, or if you’re sure it’s your last night out. You’ll get damp, but you should dry quickly from hiking in the morning.

How To Stay Warm Backpacking

– Take a water-bottle full of hot water to bed with you. This is easier and safer than heating rocks and placing them around you.

– Make a pine-needle mattress. Dead leaves and dry grass work too. Scatter the leaves in the morning, so they won’t smother the plants underneath. I’ve slept warmly below freezing, with no sleeping bag, in a pile of dry grass collected from a frozen swamp.

– You can breathe into your sleeping bag if you’re really cold. You should only do this in a dry climate, or if you’re sure it’s your last night out. You’ll get damp, but you should dry quickly from hiking in the morning.

– Fill a water bottle with hot water, and take it to bed with you. This is easier and safer than heating rocks and placing them around you.

– Adjust your clothing as you hike. Remove and add clothes as necessary to stay warm without sweating. Sweat can cause you to lose heat rapidly when you stop.

– Stay dry. On a cold day, wet and hot can become hypothermia soon after you stop moving those muscles. On a hot day, however, wear wet clothing to dry it out in preparation for a possibly cold night.

– Conserve your energy. It’s tough for your body to keep itself warm with no energy reserves. You may also need that energy to gather firewood or hike to the car to escape a blizzard. Finally, you’ll make better decisions if you aren’t tired, and you’ll remember how to stay warm.

This is a sampling of wilderness skills and knowledge. There are many more things to learn about how to stay warm. For more backpacking help and information, click here.


AddThis Social Bookmark Button

Working and traveling in Uruquay

September 9th, 2017 ernie Posted in South America | No Comments »

Montevideo UruguayA friend of the writer lived in Montevideo Uruguay in 1995, 1996 and intermittently in 1997. These are her notes and thoughts about living there along with the things to see while there.

I lived there again in 2009 as well as spent vacations for 1 or 2 months at a time in 2011, 2014 and 2016. I am currently trying to arrange another month long vacation for March 2018.

Over all these years I was lucky to travel extensively for the job and for pleasure. I can say I’ve visited every corner of the country.

My two favorite areas to live are Pocitos and Punta Carretas in Montevideo Uruguay. They are adjacent areas with numerous restaurants, cafes and shopping. They are mostly apartment buildings with some older homes in the mix. The two areas stretch up from the Beaches and include parks where there are numerous vendors and booths every Saturday.

Punta Carretas has a large 3 storey Shopping Center, named Punta Carretas on Ellauri St. and there are some great boutiques and shops and a top floor with movie theaters, most in English with sub titles and a food court and a couple of restaurants. The bottom floor has a large supermarket called the Disco and all the usual shops you’d expect to find in a Shopping Centre. It used to be a prison in the past and has the original facade. There are 2 restaurants at the entrance gates, McDonald’s and an Italian café-restaurant called Don Pepperone. It is very casual and has a large patio.

Montevideo Uruguay Sheraton Hotel

The Sheraton Hotel is right behind the shopping center and is accessible from the 2nd floor. It is very modern and has a nice lounge and restaurant. Just a block or 2 from the Sheraton, towards the water and the Rambla, the street that follows the shoreline is one of my favorite restaurants. La Perdiz. It has a small patio, great food and is a favorite of locals and expats. Tel 2711-8963

There is reliable public transportation and taxis are very reasonably priced with taxi stands on main corners and easily accessible by phone.

The whole City is on a wide point and Pocitos and Punta Carretas as split into each side of a point by the street 21 de  setiembre which runs from the beach and up.

My favorite restaurants in this area besides La Perdiz are:

Fellinis – Corner of Benito Blanco and Marti, Tel 2706-0252  Try the Brie and Carmelized Onion Appetizer

La Cavia – corner of 26 de Marzo and Cavia, Tel 2706-8253 Good BBQ (Parrilla in Spanish)

Da Pentella – Corner of Luis de la Torre and Francisco Ros, Tel 271200981 Very intimate and cozy

Mercado Del Puerto in the Old City Montevideo Uruguay:

El Palenque  – in the Port área where the cruise ships dock – Tel 2915-4704 This is a great spot for Saturday and Sunday afternoons with a huge patio and the best Petit Filet, with mushroom sauce or my favorite, Roquefort Sauce. There is always lots of action in this area with vendors selling art, jewelry, handmade toys, leather purses and other touristy stuff.

There are a lot of restaurants in Montevideo Uruguay but these are some of the best I’ve experienced, with great food and great value for price.

If you get a chance to get out of the city for a weekend there is good bus service between Montevideo from the main bus station at Tres Cruces. It is only about 1 ½ hours to Punta Del Este a favorite tourist spot for visitors with hotels and many restaurants. One side of the point has big waves and attracts surfers and the other side has nice beaches and many with restaurants that offer beach chairs to rent and service to your spot. It is close to Barra, another interesting beach town. They probably have tours to showcase both places. If you take a tour don’t miss Casa Pueblo just outside Punta De Este.

Weekend Trips around Montevideo Uruguay

Another easy weekend trip is to Buenos Aires. You can fly there in a half hour and land in the airport close to the city and many hotels. As a Canadian you need to secure a Reciprical Visa which is available on-line and must be purchased prior to going. Although I’ve flown in the past, it is always easy to take the Ferry Buquebus from Montevideo to the port in BA. I prefer to take the land Buquebus to Colonia and then the fast Buquebus Ferry from there to the BA port, only 45 minutes but then I get seasick. Buquebus has its own tour company and it is located on a side street just across from Punta Carretas Shopping.

The last time I was there I was able to get a 3-night stay at the Hotel Americana in Buenos Aires for around $230 US and that included the Hotel, bus from Montevideo Uruguay to the Port in Colonia, the fast ferry to BA port, be met by a driver in BA who takes you to the hotel and pick-up by the driver on departure day and the return trip. A real bargain.

Friday Night Dinner

When I go on a Friday night I always go to the Puerto Madero for dinner on Friday and highly recommend Bice, an Italian Restaurant with great Veal Marsala, we go to Buceos on Saturdays, a very colorful area with restaurants shops and street vendors. I recommend visiting Senor Tango Saturday evening. You can purchase your ticket at the hotel, and it includes pick up by a bus, a full dinner in the nightclub and if you go alone, they will set you with other guests, very friendly, wine, and a pick up by the bus after the show, usually around 1AM. The bus driver gives you the bus number when you arrive so you can easily find it on departure. As you’ve paid at the hotel, you just need some cash for restaurant and bus tips. The show is excellent with a troupe of dancers and singers who entertain throughout dinner and afterwards. I think it was around $70 the last time I went.

Sunday is ideal for visiting San Telmo, another area full of vendors with a lot of antiques and artists. It is just nice to relax at a café and watch the world go by. All the taxi drivers are familiar with these places and they are great walking around spots. If I were there I’d probably go back to Puerto Madero for dinner on Sunday evening.

An Italian Restaurant

There is another Italian Restaurant just to the left of Bice. Which is also very good with a lovely patio and view. Of course there is the beautiful Opera House Teatro Colon. Which has a great opera and ballet season or is just great to visit on their tours. It is fascinating and takes you down below the street to visit the costume makers, set makers, set carpenters. Also the orchestra and ballet school practices. I went there once to see Aida and it was spectacular.

I highly recommend taking the City Tour of Montevideo Uruguay if you make it to BA because it certainly gives you the flavor of the city. Of course that is also an interesting way to see Montevideo but I’m guessing as a world traveler I don’t have to tell you that.

For more posts about South America places to visit, click here.


AddThis Social Bookmark Button

Ultralight Sleeping Bags

September 7th, 2017 ernie Posted in Backpacking | No Comments »

Why ultralight sleeping bags? Because ultralight backpacking is only made possible by cutting the weight of the “big three;” the backpack, shelter and sleeping bag. The days of five-pound summer bags are gone – at least for those of us who prefer to go light.

One Pound Ultralight Sleeping Bags

There are several one-pound ultralight sleeping bags on the market now. My own is 17 ounces. It actually weighs 19 ounces with the stuff sack, but stuff sacks aren’t always necessary. It can be stuffed directly into my pack or put in a half-ounce bread bag. It’s a down sleeping bag, and has kept me warm down to below freezing – warmer, in fact, than my four-pound bag used to keep me.

It appears fragile, and I’ve babied it over the years, but it may be tougher than I thought. I’ve used it from sea-level to 16,000 feet, in all types of weather, usually camping under a tarp, yet it still has its loft, and it appears almost new. The zipper goes only half-way down, to save weight, and it’s a mummy bag, but I’m 6’3″, 165 pounds, and I’ve always been comfortable in it.

Sleeping bags weighing around a pound are summer bags, rated down

Ultralight Sleeping Bags

to 40 to 50 degrees Fahrenheit. A quick check of the newest bags out there, though, shows that even one or two of the 0-degree bags are under three pounds now. These are down-filled bags, of course, as down is still the lightest insulation for its weight.

Another big advantage of any down sleeping bag is its compressibility. Nothing packs smaller than down. However, a good synthetic bag is probably better than down if you are regularly getting it wet.

Several synthetic-fill sleeping bags now come close to down in their warmth-to-weight ratio. At least one summer bag, using Polar guard fill, weighs an even 16 ounces. That’s amazingly light for a synthetic bag.

Using Ultralight Sleeping Bags

Ultralight sleeping bags generally aren’t tough. The lighter the bag, the more fragile, but treat them gently, and they work fine. I’ve used mine for many years, in snow and rain, from Ecuador to California to Michigan, and it shows little wear. Baby these things and they can last a long time.

For more information on backpacking, click here.

AddThis Social Bookmark Button

How to stay fit with bad knees

September 5th, 2017 ernie Posted in Exercise | No Comments »

Are you suffering from bad knees? Perhaps you have a lot of pain in your knees every time you walk up the stairs. Many people who run for exercise, enjoyment and sport find that their knees are starting to hurt a great deal. Consumers who play squash, racquetbal cause the knee to be injured from the twisting and turning in those sports.  The continuous pounding, twisting and turning wheel overtime damage ligaments and cartilage in your knee. You may find that your knees ache, or there’s a lot of pain when you climb stairs. It may be time to consider something different in terms of exercise that has less impact on your knees . Otherwise, you may find that you need knee replacement operations sometime in your future.

The writer played squash until he was 35. Climbing the stairs was painful with sharp needle like pain in the knees. He decided to stop playing squash and take up another sport that was less painful and damaging to the knees.   In the writers case, he took up cycling and within six months a pain in the knees was gone and he was able to climb stairs with no pain whatsoever.

If you were beginning to experience pain of the sort from the continuous pounding of running or some other sport it may be time to consider a different sport. The following is a list of potential sports to be considered  to help with this problem.

Alternative sports for bad knees

Swimming – is an excellent sport to consider and has one of the least impact on joints. It also exercises almost all of the muscles in the body as well as work on your cardio system.

Running in the pool –  if you do not like swimming or cannot swim consider running in the pool. Running in the pool has far less impact on joints with additional resistance from the water providing you with great exercise and cardio improvement.

Cycling –  is another sport that you can do anytime and has the flexibility of just getting on your bike and going out for a  ride. You can spend a lot of money on a bicycle, define one of the lightweight ones that allow you to go really fast. However you should remember that your goal is to gain exercise, cardio exercise so the heavier the bike the more exercise you’re going to get .

Gym –  not everyone likes to go to the gym, but this might be the best approach for many people with joint problems. There are many exercises that you can do at the gym that avoid joint irritation. Avoid the treadmill, use the stationary cycling or some of the cross trainers.

Remember, you want to avoid the pounding on your knees and joints, while at the same time strengthening the muscles around your knees together additional support and avoid that pain and eventual knee replacement surgery.   Bad knees can be a thing of the past with the proper exercise. Get started today.


AddThis Social Bookmark Button

Lightweight Tents – How Light?

September 1st, 2017 ernie Posted in Camping | No Comments »

Why use lightweight tents and ultralight tents? Because a heavy tent is one of the biggest obstacles to lightweight backpacking. You have to cut the weight of the “big three” (shelter, backpack and sleeping bag) to really go light. How do you choose one, though? Start by asking yourself the following questions:

1. Are you claustrophobic? Some ultralight tent designs are really just fancy bivy sacks. For those who hate tight squeezes,it will be like sleeping in a coffin.

2. How tall are you? If the length of the tent is only a few inches more than your height, you’ll be touching the walls. This probably means getting wet from the condensation on them.

3. What do you do in a tent? If you just sleep, total floor and head space are not important. If you normally play cards with friends for hours, you’ll need a design that allows for that.

4. Do you backpack in bad weather often? If all you plan to do is camp on nice summer nights, you can just look at the cheapest lightweight tents, and worry less about quality

5. How much have you budgeted for a tent? More money equals a lighter tent, but if you can’t get it light enough on your budget, you may want to consider going even lighter – and cheaper – with a tarp shelter.

6. Which is more important to you, fast set-up or lightest weight? Hopefully you’ll find a tent with the right balance, but keep your preference in mind when shopping.

More About Lightweight Tents

Single-layer tents (without a rain-fly) will usually have more condensation inside.

Light Tents – How Light?

This is true of even those that claim to be waterproof and breathable. It is less of a problem with the newer designs that have a lot of screen/ventilation area, because air circulation is as important as “breathable” material. These materials just don’t breathe that well anyhow.

Test your tent. It’s no fun spending 20 minutes setting up a complicated tent in the rain. Also, it can be worse than inconvenient to tear seams because of a design that stretches everything so tight you have to fight with it. Try the tent in your yard or living room, before you head into the wilderness.That way you can return it if it won’t work for you.

There is only one totally enclosed 2-person ultralight tent that I know of under 3 pounds. It’s a single layer, but the forward sloping door allows for a large screen area, to keep air-flow at a maximum. This keeps condensation to a minimum.

There are “floor less” tents, which are specially cut tarps which typically use your trekking poles for support. One of the lightest of these is a three-person design that weighs less than2 pounds. I haven’t tried it, but it gets good reviews, and it is in the weight range I like for ultralight tents. You have to bring a groundsheet with this type, so figure that weight into the decision.

Unfortunately, I’ve discovered the hard way – four tents and counting – that you tend to get what you pay for with lightweight tents. That’s one of the reasons I backpack with a tarp. For more camping related information, click here.

AddThis Social Bookmark Button

Hole Jackson Rafting whitewater

August 28th, 2017 ernie Posted in Arizona | No Comments »

Jackson Hole raftingJackson Hole rafting is home to one of the most exiting activities in the world. As a result White Water Rafting has quickly become a summer activity favorite in this area. There are rafting trips with the calm, scenic upper Snake River offering a unique perspective of Grand Teton National Park. Above all there is the wild and exciting Lower Snake River.

The lower Snake River route runs through the whitewater area of the Snake River Canyon. Certainly many rafters can experience Big Kahuna and other fun rapids around the area. It’s Jackson’s most popular trip for good reason! Jackson Hole lies just west of the Continental Divide. Furthermore the Snake River watershed occupies about 400 square miles. The waters of the Snake River take up part of the valley. In addition it makes for an impressive view. The Snake River provides fantastic whitewater rafting opportunities. These are opportunities everyone in the family will enjoy. Participants must meets specific requirements for some routes.

The Jackson Hole Whitewater offers Whitewater and Scenic Rafting Trips on the Snake River. This area provides 8 miles of the wildest adventurous whitewater trip in Jackson Hole. Float for 13 miles past some of the most beautiful scenery in Jackson Hole. The entire trip takes about 7 hours and many outfitters will include lunch on the river.

Jackson Hole rafting whitewater

Snake River in Jackson Hole Whitewater Rafting

Take Water River Trips through 8 miles of whitewater in the Grand Canyon of the Snake River. Combine spectacular scenery with the excitement of rolling rapids. This trip has all the ingredients for the perfect river adventure. The small 8-man paddle rafts are available on the whitewater section starting in June.

Overnight Trips-Scenic/Whitewater Combo

There are many whitewater rafting outfitters in the Jackson Hole area. You can find many on the internet. However we suggest that word of mouth and referrals is always the best way to go. Going on a class 1 or 2 set of rapids is not dangerous with only 2 foot waves. Each rafting company will provide guidelines for who can participate on each trip. There are height, physical and swimming ability requirements on many of the more aggressive trips. Always check ahead of time before you book your whitewater trip.

However higher class rapids will require more skilled guides. These are rapids with faster water, more waves and lots of rocks to avoid. Skilled guides can handle groups in more aggressive whitewater rapids.

For more whitewater rafting info in Arizona, click here.

AddThis Social Bookmark Button

Rafting Skill Whitewater

August 21st, 2017 ernie Posted in Physical Requirements | No Comments »

What are the rafting skills you need for whitewater river trips? Well that depends on which trip you are taking and the class of rapids that you will be navigating. Are you a beginner and want to see what whitewater rafting is all about. Most rafting companies will recommend that you take a rafting trip on a class one river rapids. These are easily navigable and you should not get wet. They are suitable for seniors, children and beginners. Once you have seen what a class one trip is like you can progress to more challenging class two or three level trips.

Most rafting river whitewater companies will have their guides spend a few minutes before you ever get on the river. They will brief you on what to expect and how to steer the raft. In addition how to put on the life vests and all other items that you need to be aware for your whitewater rafting trip. Pay close attention and follow the instructions, to ensure that you will not have any problems. You will enjoy the trip immensely and the thrills that go along with more challenging trips.

Rafting Skill Whitewater

Class 3, 4 and 5 whitewater rapids are more challenging and require more skills from participants. You must be able to follow instructions closely and quickly in fast water, you must be able to paddle to assist the group in directing the raft to the correct whitewater rapid location on the river. You must not panic while on the raft during some of the more challenging whitewater rapids which often have rolling waves and will be sure to douse you in cold river water.

There is always a chance that your raft will be flipped over or someone in the raft will be tossed in the water as you pass through some of the rougher whitewater rapids especially in class 4 or 5 river rapids . Most companies will require that you be a strong swimmer and are able to swim out of these kinds of situations. Some whitewater river companies will require that you pass swimming tests and rafting skills tests prior to actually going on some of the class 5 whitewater river rafting trips. Before you sign up , always read the fine print so you know what to expect and have a great rafting trip through the whitewater rapids.

For more information about the rafting skill whitewater and physical requirements of white water rafting, click here.

AddThis Social Bookmark Button

Rafting Speech Whitewater

August 14th, 2017 ernie Posted in White Water Etiquette | No Comments »

Almost all whitewater companies will give you a rafting speech whitewater talk prior to getting in the raft and on the river. Usually the guide assigned to your raft will spend a few minutes prior to your rafting trip to fill you in on what to expect on the rafting trip you have booked. In addition they will also cover some of the safety steps and safety equipment that you need to be aware of prior to your whitewater rafting trip. Part of the rafting speech will also cover the equipment that you will be using, how it works and what your role will be on the river rafting trip.

These rafting speeches prior to your whitewater rafting trip are very important, so pay close attention. You are not only protecting yourself, but also your raft participants. Class one river rafting trips are not very challenging, however even with these trips you will want to make sure that you have the proper safety gear and that you are traveling with the group to avoid unintentionally traversing more challenging whitewater rapids.

Rafting Speech Whitewater

Whitewater rafting trips can be a lot of fun, even exhilarating for everyone including beginners as well as experts. Always keep them safe by listening closely to the speech that your guide will give at the beginning of the trip. Even experienced river rafters should pay close attention.

Your guide will include information about current conditions of the river. In addition specifics about the section of the river that you will be rafting on. Conditions change constantly driven by dam releases, spring runoff and even local storms that drive the flows of water.

Your guide will cover all of this as part of his speech just prior to your whitewater rafting trip. Typically they will have checked the local weather, the river flow and all of the equipment prior to launch. They will also review the skill level of all of the participants. This is to ensure that everyone is ready for the type of whitewater rafting trip that is planned. Enjoy your trip, follow instructions and make sure you wear your safety life vests as instructed.

For more information about rafting speech whitewater and white water etiquette, click here.

AddThis Social Bookmark Button

Gorge Rafting Royal whitewater

August 7th, 2017 ernie Posted in Colorado | No Comments »

The Royal Gorge is one of the best white water rafting trips in Colorado and world renowned. Experience the most amazing scenery of the sheer 1100′ cliff walls that surround you. Rafting beneath the worlds highest suspension bridge.

You will challenge class IV, V rapids such as Sunshine Falls, Sledgehammer and the Narrows just to name a few. This section is suitable for first time rafters that are looking for an exciting challenge & experienced paddlers alike. Good physical condition is recommended at high water and the minimum age is dependent upon the varied water levels.

There are specialty trips also available that include a popular Water 2 Wine Heli Tour. Soak up the sun, fun and some of Colorado’s finest wine from the award winning Vineyard at the Holy Cross Abbey. This intoxicating tour operates every week Monday through Thursday.

Your adventure begins in white water rafting Colorado’s famous Royal Gorge section of the Arkansas River.

After your tour of the vineyard get ready to fly through the amazing scenery of the Royal Gorge past the famous Royal Gorge Bridge, up over the rim of the Gorge to land gently back at Royal Gorge Rafting!

Gorge Rafting Royal whitewater

Enjoy a 24-mile journey through the world famous Royal Gorge on the Historic Royal Gorge Route Railway. The Royal Gorge route is celebrated as the “Scenic Line of the World”. Pairing this tour with a Colorado White Water Rafting trip on America’s most popular river, the Arkansas, makes for an amazing event for the entire family!

Tour operators offer promotions that include both royal gorge whitewater rafting and the Historic Royal Gorge Route Railroad. You may choose which comes first, the Rafting or the Railway

You have the option to raft one day and ride the train the next day. Or experience both outstanding rides in a day?s time. Choose from any trip the Royal Gorge Route Railway offers. Pair it up with a Royal Gorge Rafting Adventure of your choice. Railway departure times are the 9:30 am, 3:30 pm or the 7:00 pm departures from the Santa Fe Depot in Ca?n City.

For more information about Gorge Rafting Royal whitewater and Colorado white water rafting, click here.

AddThis Social Bookmark Button


?>


Web Content Development